Docker Swarm lets you create and manage Docker clusters. Swarm can distribute containers across multiple hosts and can also scale containers.
Introducing Docker Swarm
A Swarm is a group of hosts that are all running Docker and have been configured to interact with one another in a clustered configuration. Once configured, you will be able to use commands that target a single host and let Docker Swarm decide where to place your containers by using a deployment strategy to determine the best host on which to launch your container.
What roles are involved with Docker Swarm? In a Docker Swarm cluster, hosts can play two roles:
I. Swarm manager
The Swarm manager is a host that serves as the primary point of contact for all Swarm hosts. All commands to control those nodes are issued through the Swarm manager. You can change nodes, join nodes, remove nodes, and manipulate those hosts.
Each cluster can have multiple Swarm managers running.
It is recommended that you run a minimum of five Swarm managers in production; this means that our cluster can withstand a maximum of two Swarm manager node failures before you start to see errors.
II. Swarm workers
Swarm workers, also known as Docker hosts, are the ones who run the Docker containers. Swarm workers are managed by the Swarm manager and are depicted in the diagram below:

Creating and managing a Swarm
Let’s now take a look at using Swarm and how we can perform the following tasks:
- Creating a cluster
- Joining workers
- Listing nodes
Creating the cluster hosts
Let’s start by creating a cluster of three machines. Since we are going to be creating a multi-node cluster on our local machine, we are going to use Multipass. To launch the hosts by running the following commands:
$ multipass launch -n node1
$ multipass launch -n node2
$ multipass launch -n node3
This should result in three nodes; you can verify this by running the following command:
$ multipass listYou should see something similar to the following output:

Now, let’s install Docker and add the ubuntu user to the docker group so that when we use multipass exec, we don’t have to change user. To do this, run the following three commands:
$ multipass exec node1 -- \
/bin/bash -c 'curl -s https://get.docker.com | sh - && sudo
usermod -aG docker ubuntu'

$ multipass exec node2 -- \
/bin/bash -c 'curl -s https://get.docker.com | sh - && sudo
usermod -aG docker ubuntu'

$ multipass exec node3 -- \
/bin/bash -c 'curl -s https://get.docker.com | sh - && sudo
usermod -aG docker ubuntu'
Adding a Swarm manager to the cluster
Let’s bootstrap our Swarm manager. To do this, we will pass the results of a few Docker Machine commands to our host.
Before we create the Swarm manager, we need to get the IP address of node1 as this is going to be our Swarm manager.
If you are using macOS or Linux, then you can set an environment variable by running the following command:
$ IP=$(multipass info node1 | grep IPv4 | awk '{print $2}')If you are using Windows 10, then run multipass list and make a note of the IP address for node1.
The command to run in order to create our manager is shown in the following code snippet (if you are running Windows, replace $IP with the IP address you made a note of):
$ multipass exec node1 -- \
/bin/bash -c 'docker swarm init --advertise-addr $IP:2377 --listen-addr $IP:2377'
You should receive a message similar to this one:
Swarm initialized: current node (92kts1c9x17gbqv3in9t1w4qm) is
now a manager.

To add a worker to this swarm, run the following command:

docker swarm join --token SWMTKN-1-4s8vpkileg2l2sicpya
y5fojhis9jygb8mv04tsy9jmeqmzhk8-4cp4hp0i1qjqpuln6q3ytprtc
192.168.64.9:2377

To add a manager to this swarm, run 'docker swarm join-token
manager' and follow the instructions.
As you can see from the output, once your manager is initialized, you are given a unique token.
In the preceding example, the full token is this:
SWMTKN-1-4s8vpkileg2l2sicpyay5fojhis9jygb8mv04tsy9jmeqmzhk8-4cp4hp0i1qjqpuln6q3ytprtc.This token will be needed for the worker nodes to authenticate themselves and join our cluster.
Joining Swarm workers to the cluster
Now it is time to add our two workers (node2 and node3) to the cluster. First, let’s set an environment variable to hold our token, making sure that you replace the token with the one you received when initializing your own manager, as follows:
$ SWARM_TOKEN=$(multipass exec node1 -- /bin/bash -c 'dockerswarm join-token --quiet worker')Again, Windows users need to make a note of the token and will have to replace both $SWARM_TOKEN and $IP in the command shown next with their respective values.
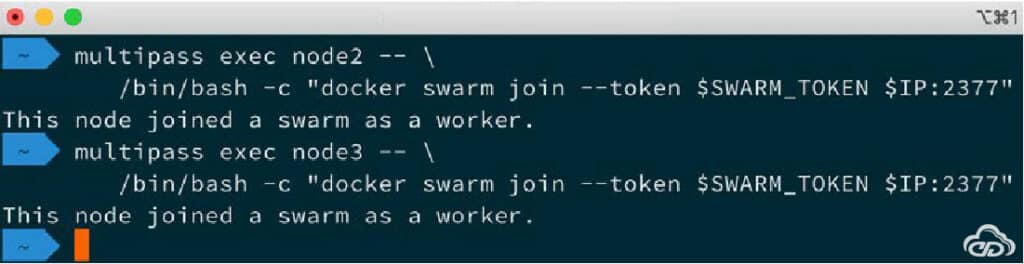
Now, we can run the following command to add node2 to the cluster:
$ multipass exec node2 -- \
/bin/bash -c 'docker swarm join --token $SWARM_TOKEN
$IP:2377'
For node3, you need to run the following command:
$ multipass exec node3 -- \
/bin/bash -c 'docker swarm join --token $SWARM_TOKEN
$IP:2377'
Both times, you should get confirmation that your node has joined the cluster, as illustrated in the following screenshot:
Listing nodes
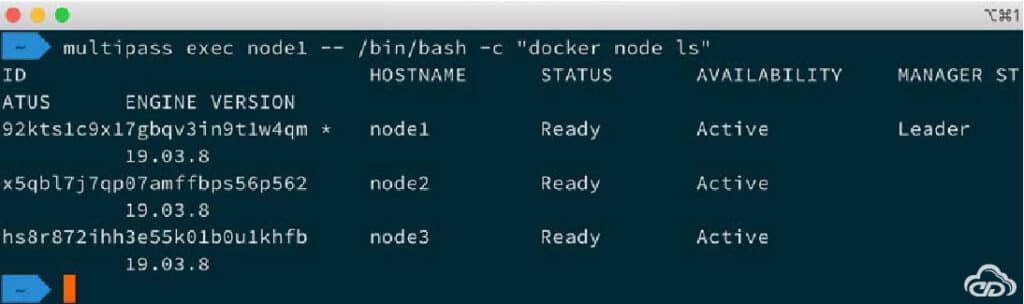
You can check the Swarm by running the following command:
$ multipass exec node1 -- /bin/bash -c 'docker node ls'This will connect to node1, which we have configured as the Swarm master, and query all of the nodes that form our cluster.
You should see that all three of our nodes are listed, as illustrated in the following screenshot:
Now, we are going to move from the Docker client on our local machine to that on node1. To connect to the shell on node1, we just need to run the following command:
$ multipass shell node1This will leave us at a prompt on node1, where we are ready to start using our cluster.