Have you ever wanted to be able to access your home computer or server from anywhere in the world? With a Dynamic DNS service, you can! In this article, we’ll show you how to set up a free Dynamic DNS service using ddclient on Kubernetes. We’ll also walk you through how to configure your firewall and router for remote access.
Let’s get started!
In today’s digital age, it’s more important than ever to have a secure and reliable way to access your data from anywhere in the world. A Dynamic DNS service is a great way to do just that. With ddclient and Kubernetes, you can easily set up a free Dynamic DNS service that will allow you to remotely access your devices from anywhere in the world. Let’s take a look at how it works.
How it works.
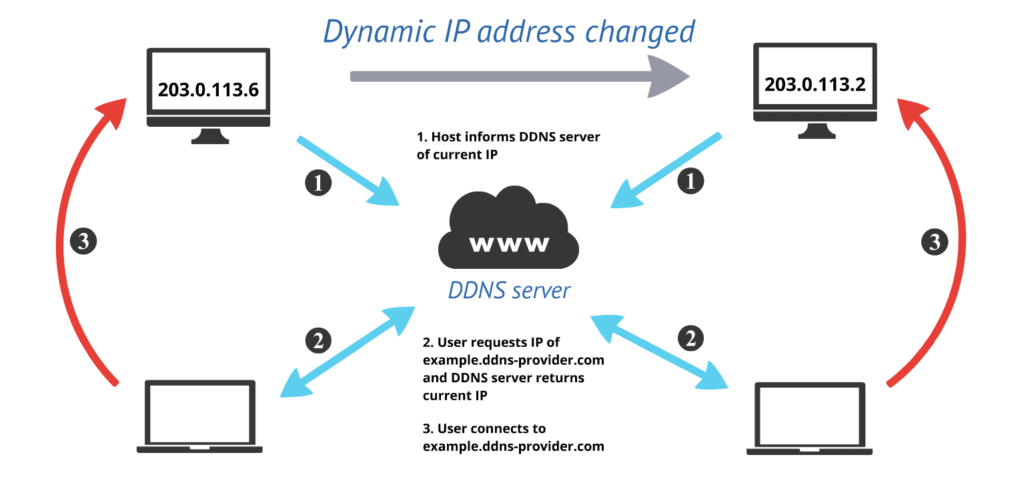
Dynamic DNS is a service that allows you to register a domain name and have it automatically updated with your current IP address. This is convenient if you have a dynamic IP address that changes frequently, as it allows you to keep your domain name pointing to your current IP address without having to manually update it.
Dynamic DNS services typically work by running a small program on your computer that periodically checks your IP address and updates the DNS records for your domain name accordingly. Some routers also have built-in support for Dynamic DNS, which can make setting up and using Dynamic DNS even easier. Whether you’re using a Dynamic DNS service or not, understanding how Dynamic DNS works can be helpful in troubleshooting any problems you may have with domain names or web hosting.
Static IP – A static IP address is simply an IP address that doesn’t change. This can be extremely useful if you need to remotely access your computer or if you want to run a server that other people can connect to. Of course, there are some downsides to having a static IP address.
ddclient – is a Perl-based client used to update dynamic domain name system (DNS) entries for domains. It works by sending updates to a DNS server whenever the IP address changes. This allows users to access a home computer or server by its domain name, even if its IP address changes frequently. The program can also update multiple DNS entries simultaneously, making it ideal for users with multiple computers or servers. ddclient is open source software released under the GNU General Public License. The project is hosted on SourceForge.net.
Kubernetes + Dynamic DNS
One of the great things about using Kubernetes for Dynamic DNS is that it’s easy to set up and configure. In this article, we’ll show you how to get started with setting up your own free Dynamic DNS service using ddclient on Kubernetes. We’ll also walk you through how to configure your firewall and router for remote access.
What You Will Need
To follow this guide, you will need the following:
- A computer with an internet connection
- A Kubernetes cluster
- The ddclient software
- A domain name (optional)
Step 1: Set Up Your Kubernetes Cluster
If you don’t already have a Kubernetes cluster, you’ll need to set one up. Once you have your cluster set up, you’re ready to move on to the next step.
Step 2: Install ddclient
Next, you’ll need to install the ddclient software onto your computer. ddclient is a small program that will allow your computer to automatically update your Dynamic DNS records.
You can install ddclient by running the following command:
$ curl -L -o /usr/local/bin/ddclient https://github.com/xyb/ddclient/releases/download/v3.8.3/ddclient-3.8.3-linux-amd64Once ddclient has been installed, you’re ready to move on to the next step.
Step 3: Configure ddclient
Now that ddclient is installed, you’ll need to configure it to work with your Kubernetes cluster. To do this, you’ll need to create a file called /etc/ddclient.conf and add the following lines:
    pid=/var/run/ddclient.pid

    protocol=dyndns2

    server=yourserver

    login=yourusername

    password='yourpassword'

    yourname.dyndns.org
Replace “yourname” with the domain name you want to use for your Dynamic DNS service. Replace “yourserver” with the address of your Kubernetes cluster. And finally, replace “yourusername” and “yourpassword” with the username and password you use to log into your Kubernetes cluster.

Once you have ddclient configured, you’re ready to move on to the next step.
Step 4: Start ddclient
Now that ddclient is installed and configured, you’re ready to start it up. To do this, simply run the following command:
$ ddclient -daemon=0 -debug -verbose -noquietThis will start ddclient in the background and it will begin updating your Dynamic DNS records automatically.
Step 5: Configure Your Firewall and Router
If you want to be able to remotely access your devices from anywhere in the world, you’ll need to configure your firewall and router. To do this, you’ll need to forward port 80 (HTTP) and port 443 (HTTPS) to the IP address of your Kubernetes cluster.
Once you have your firewall and router configured, you’re ready to move on to the next step.
Step 6: Test Your Connection
Now that you have everything set up, it’s time to test your connection. To do this, simply connect to your Kubernetes cluster using the domain name you configured in ddclient. You should be able to access your devices from anywhere in the world.
Conclusion
If you’re looking for a way to set up a free Dynamic DNS service, ddclient is a great option that can be run on Kubernetes. In this article, we walked through the steps of setting it up and showed how easy it is to get started. Have you tried using ddclient on Kubernetes? Let us know.